
This week we will have articles on axes, vehicle craziness and today, budget knife making. I really like today's post and I can't wait to try it myself with a mule deer antler and a mora blank. Thank you, Bernard Ten Bears, for this wonderful article.
Pax Domini Sit Semper Vobiscum,
Mike, Oscar, Hotel......out.
IMPROVISING TO MAKE A VERY USEFUL YET CHEAP UTILITY KNIFE
By Bernard Ten Bears
Times are getting tough. Gas in Northern Maine is over $4.00 per gallon and climbing. The price of food is ridiculous. And as far as insurance, health care and electricity…all are leaning toward being absurd, price wise that is.
So, we still like to have fun. Woodsman and farmers in Maine have not always depended on large department stores or hardware stores for their tools.
For instance, my Dad was born into and brought up during the Great Depression. He never graduated high school, he went back home to help with farming potatoes around grade 10 and then mostly spent the rest of his working life as a log loader operator at the local wood chipping plant. He could, however, fix or build anything. In this he was above average in every way. He had old tools and not much money. For example: I watched him fix an old style, 4 wheel drive transfer box with a chain and an elm tree. This was done in the front yard at home.
He had been chasing a moose with his pickup truck, a 1973 Dodge ¾ ton 4 wheel drive (it was 1975). In Northern Maine one might compare this to a cowboy or wrangler chasing buffalo for fun (while on horseback) in 1880. In the tall hay he struck a rock. It bent the transfer case back. To repair this would certainly have taken a shade tree mechanic a month of Sundays.
My Dad got the truck home, wrapped one end of a heavy chain around the transfer box and the other end around the ancestral elm tree in front of the garage and had my brother look underneath the truck. He slowly backed up in 4 wheel drive (low range). When it looked like it was at a 90 degree angle a “GOOD!” from my brother was the end of the repair. It lasted another 5 years before he had any trouble with the transfer box again. Now the windbag in me is taking over. Isn’t nostalgia fun?? You have to admit, it was a cheap solution to a big problem.
Dad and my brothers taught me the art of getting something useful out of things others pretty much consider worthless. Is that a skill to have in a throw-away society? You bet it is.
I’m an office manager and work with a dozen foresters. Each spring as the snow melts they spend time picking up dropped moose antlers. It’s a paying hobby. At one time they could sell antlers for as much as 12 dollars per pound if they had not been chewed by mice, snowshoe hare or porcupines. The sun bleached and chewed ones (that are not marketable) come to me. I trade for things such as packages of beef jerky, candy bars and burl knots.


Face it; I am a lot like Tom Sawyer with the crew I work with; though I have neither gotten anyone to trade marbles for a look at my sore toe, nor gotten a nice apple core for letting them whitewash my fence. I would trade beer for things, but as a lifelong teetotaler it would just go against my nature, though it would be a welcome gesture among my peers.
This craft is easy enough to do for anyone used to working with their hands and pretty simple for those not so inclined. Thus I share the skill with you for some cheap fun on your part. You can never have too many knives, each one with a special and useful purpose.
Any antler has pith in the center. It can be a “green” antler or a nice dry one. I buck the antler the lengths I want with a chain saw. The deer or moose kindly provide various diameters, no sizing required.


The chemical makeup of the pith is a mystery to me. I never took chemistry class. I do know, however, that if you boil an antler the pith in the middle becomes very soft. If you insert something into it, letting it cool sufficiently, whatever is stuck in there, will never come out. It holds with a fastness of epoxy or cement. This is a part of creation that is absolutely amazing to me.

I like to cut and grind knife blanks out of old band saw blades. This requires no forging and the steel is excellent. Even an old file is good hard steel for knife making. Those two methods are the most labor intensive of anything I do.
Even more appealing to my sense of cheapness (and a want to be lazy) is taking old butchering knives, paring knives and basically any kind of Salvation Army store, yard sale, or dump find and re-grinding (shaping) them on the bench grinder.

I chisel or lop off whatever handle is on it and cut the blade down to my suited purpose, such as: a one handed drawknife (known in Northern Maine as a “crooked knife”), a meat cutting knife, a skinning knife, whittling knife, etc. This method and material works very well for file handles, rasp handles and chisel handles too.

I have an old meat cleaver on which the wooden handle is way too small for my liking. It will likely have a large crowned moose antler handle on it before mud season is over this year. The steel is a little thicker than the blades I’m used to grinding, so it now is a lengthier grinding process for another time…
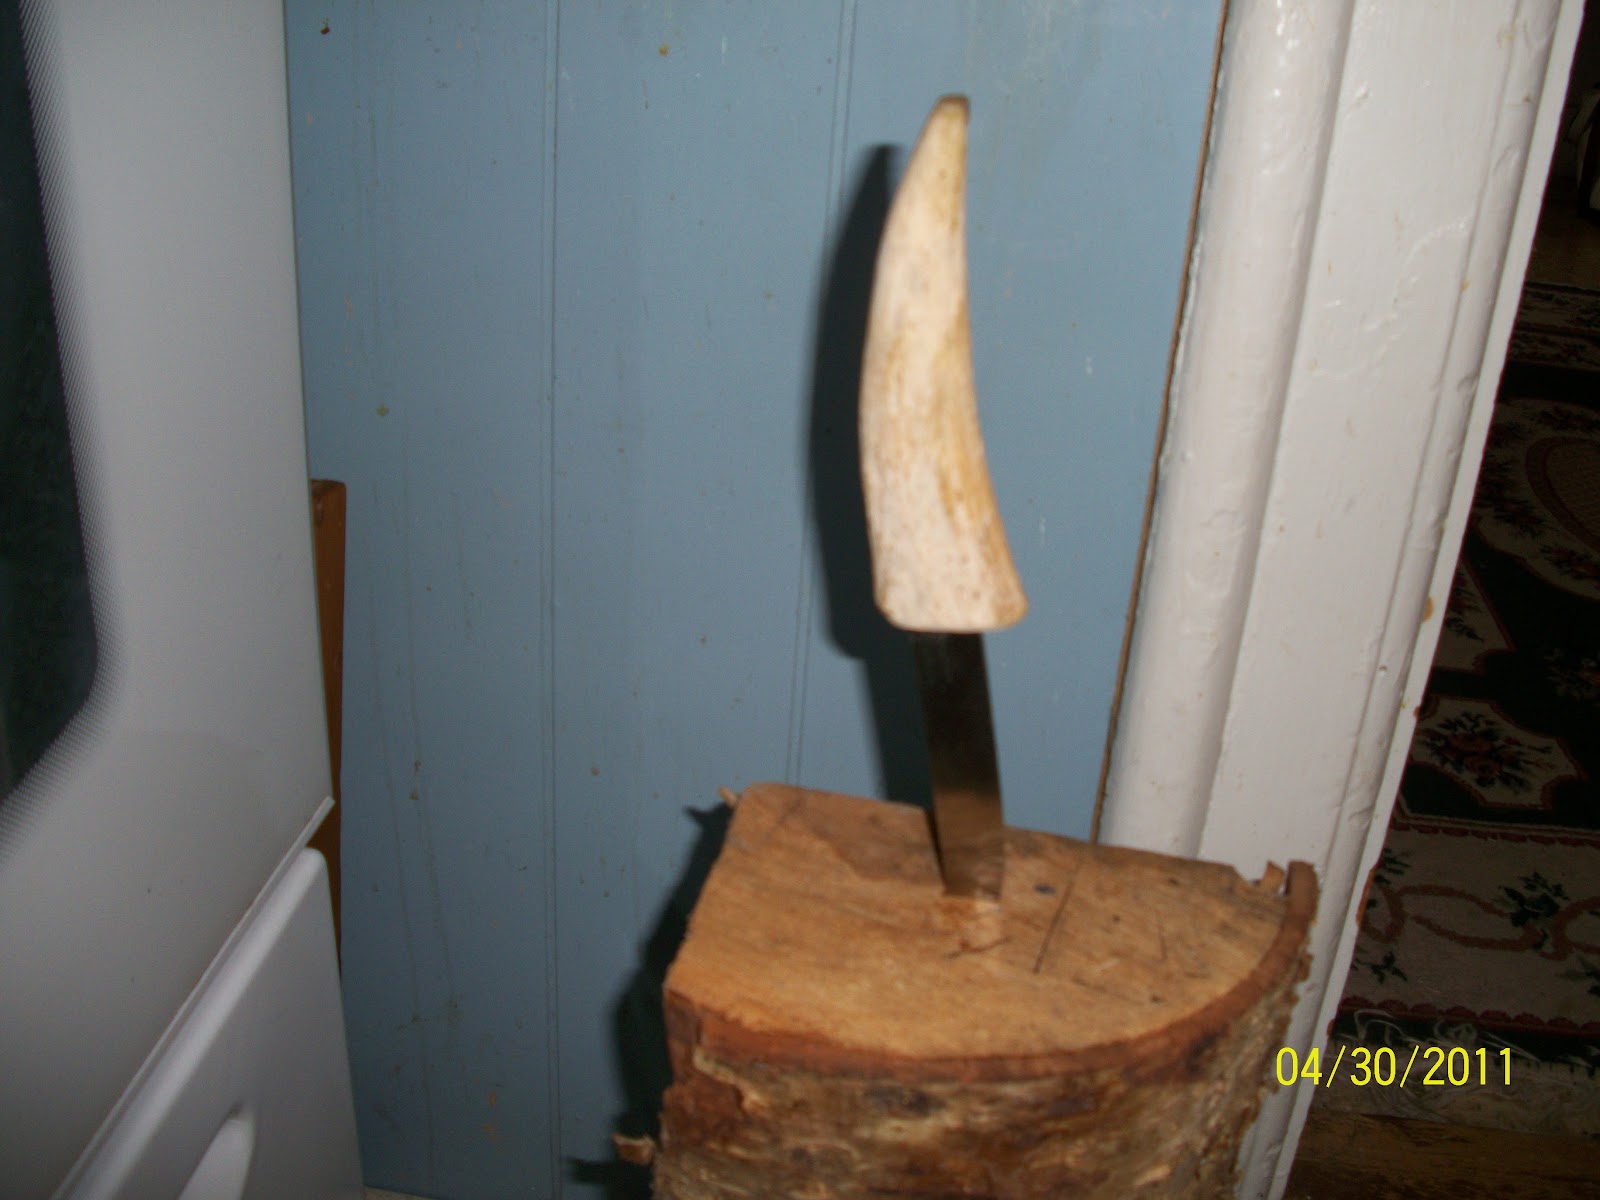
I then grind the knife tang down to a size of two or three inches (sometimes less). At this point it can be inserted into whatever size antler center I happen to want to match to the blade. I’ve tried various shapes and find that a pronounced “V” shape, nice and pointy, left very wide, into a wide antler works very well.
You can be cutting your blank while boiling the antler, for you efficient types who always like to be doing a few things at the same time. The antler needs to boil about an hour or hour and a half. For the sun bleached antlers, I usually throw in a couple of tea bags (black tea, not herbal) and this gives them a nice antiqued look as well as cutting the stink of boiling an antler (and yes I do this on the stove inside the house). It is especially fun to do outside on an open fire. If the knife blank is carbon steel and not stainless, soaking it in vinegar for a day will patinize the steel giving it a vintage or antique look. It ends up looking “gunmetal” grey, at least to my eyes.
Ready your knife blank in a block of hardwood (I use a block of 20” firewood-my high-end work bench). Thump the steel blank a couple of times, enough to get it into the wood a quarter inch or so. When the antler is ready, remove the antler from the boiling water with tongs and a pot holder, take it to the block of wood and hammer the antler all the way on to the prepared tang. I have often thought a wooden mallet would work best, but I have never had to build a hammer or look too hard for one either.


It pays to take care that the antler is in the very spot that you want it to be as when it is pounded on, you must not move it around. The pith is not like rubber or glue and does not fill back in where you have rooted around with the sharp end of the blank/tang. It is also fortuitous that the curve of an antler allows a custom fitting grip for a left handed, or right handed person. A big handle can be used on a small blade for superior blade control for carving. And a petite handle can be put on for someone with slender or small hands (i.e.) a woman or a young person. The possibilities are not endless, but if the wheels in your head like to spin on things like this; it will indeed keep your mind entertained for quite some time; take it from me…


One of the beauties of this project is the simplicity. All that you need is a saw, an antler, a blade, a pot of water, a heat source (open fire?), a hammer, a pot holder, and a block of wood. The grinder is the highest technology you need and in a pinch, that work could probably be done with a file. A work shop, and bench are not really required. Talk about bushcraft…
Bernard Ten Bears
Talk about handy! I sometimes REALLY hate pinning handles on my knives ... usually end up grinding off to much brass while im heating it up on the sander and dent or crack the material; and i just hate using epoxy ...period. Have you tested to see just how much force it can withstand before coming off? Do you sand or roughen the tang before hammering it on? Great work man, THANKS!
ReplyDeleteTWT
http://thewanderingthinker.blogspot.com/
There are only two ways it will come off-if it was done right, which requires experimenting. That is break the antler off with a hammer on an anvil or boil the whole knife, blade and all until the pith softens up again. They are weak at the tang, but every knife is anyway. BERN
ReplyDeleteBrilliant! You learn something every day. I never knew about the pith in antler.
ReplyDeleteMany thanks.
http://woodsrunnersdiary.blogspot.com
Cool Stuff, but sadly i live in Australia. if anyone can tell me what kind of animal horns i can use available in Australia for this kind of work, pleas.
ReplyDelete